EMAX E8 2.4GHz 8CH Dual-frequency Left Right Switch Mode2 Radio Transmitter Built-in USB Charge Wired Trainer Interface for EMAX Tinyhawk III RC Drone


ONLY €60 for EMAX E8 2.4GHz 8CH Dual-frequency Left Right Switch Mode2 Radio Transmitter Built-in USB Charge Wired Trainer Interface for EMAX Tinyhawk III RC Drone
*PLEASE NOTE that to avoid customs duties, select Banggood Express or EU Priority Line
For more EMAX offers – HERE
For Banggood Coupons see – HERE

EMAX E8 2.4GHz 8CH Dual-frequency Left Right Switch Mode2 Radio Transmitter Built-in USB Charge Wired Trainer Interface for EMAX Tinyhawk III RC Drone
OVERVIEW:
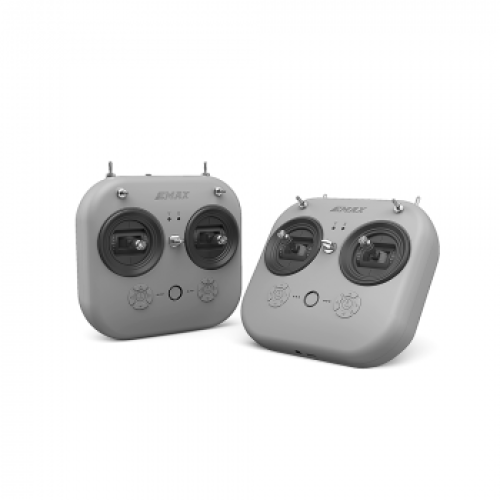
E8 Transmitter is a new wireless controller released by EMAX.It has a built-in 2.4GHz dual-bandantenna and 2.4GHz RF module.The RF module supports 8 channels.The channel range is configurable and compatible with most receivers on the market.It is equipped with a wired trainer interface and simulation.The Mode of the device can switch between left and right hand modes,and the ergonomic design can bring a good user experience paired to gether with a built in battery which can be charged via USB.
(Manual)
Brand Name: EMAX
Item Name: E8 Radio Transmitter
Model: E8
Weight: 260g (without battery)
Size: L*W*H=150x140x45mm
Working voltage: 3.7V-4.2V
Channel: 8 channels, all channels can be configured
External interface: Micro USB interface, 3.5mm audio interface (wired trainer interface)
Transmitting module: built-in 2.4GHz dual-frequency FPC antenna, 2.4GHz RF transmitting module
Working frequency band: 2.4GHz (2400MHz-2483.5MHz)
Maximum output power: 22dbm
Charging system: Built-in USB 5V–1A linear lithium-ion battery charging system
Mode switching:
D8 mode: press the power switch and the “L1+” button at the same time: turn on and enter
D8 mode, then the mode indicator will turn solid red.
D16 mode: press the power switch and the “L2-” button at the same time: turn on and
enter D16 mode, then the mode indicator light will turn solid green.
D16 LBT mode: Press the power switch and the “L4+” button at the same time: Turn on the
controller and enter D16 LBT mode, then the mode indicator light will turn solid yellow
Battery & Charging:
The E8 Transmitter is compatible with a 18650 battery, with a working voltage of 4.3V-3.3V.
When you need to reinstall the battery, remove the battery compartment cover and install the battery according to the correct polarity (the negative pole is on the spring side of the battery compartment). Confirm that the battery compartment cover and the battery compartment are perfectly matched then push forward until locked. If the battery is not installed correctly, charging and starting cannot be performed correctly.
The remote control is charged with the micro USB at the bottom.
Charging system and battery installation instructions:
Power charging indicator status:
When Red LED is solid: charging is in progress.
When Green LED is solid: charging is finished.
Note: Use a 5V-1A adapter to charge. When the voltage is low, it will alarm. Please recharge when low.
Gimbal Trim:
Each joystick has a corresponding Trim button. Each Trim button adjusts the direction of the corresponding joystick control. Each time it is adjusted, a beep will sound. When it is adjusted to the center position, it will make a longer beep. Please pay attention to the
sound. With joysticks centered, use the Trim buttons until the drone is steadily hovering in place.
Calibration of joystick:
The E8 Transmitter is pre-calibrated, but recalibration can help solve some common issues:
1. With the E8 Transmitter turned off, press the “L3-” button and the power button at the same time as the controller turns on.
2. Wait for the center indicator to light up and change from fast flashing to slow flashing, and push the joysticks of E8 Transmitter to the maximum travel in the four directions up, down, left, and right.
3. Press the “L3-” button, the prompt will sound, exit the calibration mode, and the E8 Transmitter will then boot up.
Regarding the Mode change and switching between left and right hand operation instructions.
Package Included:
1 x E8 Radio Transmitter
ID:1916840 – SKUI83953